OS X Lion Server Gateway Setup Assistant fails to create a working NAT setup
Posted on 27 Sep 2011
Problem
After running the NAT Gateway Setup Assistant in Server Admin, clients are able to successfully ping the NAT gateway, resolve DNS, and obtain IP addresses via DHCP, but cannot access external servers. The internet connection of the gateway works, showing that the network equipment is not the problem.
Solution
The solution took a while to figure out. After much searching, I stumbled across a support document from Apple acknowledging this issue and providing instructions on how to fix it. I intend to expand upon these instructions, hopefully providing a simple guide to fixing this problem.
Run the Gateway Setup Assistant
Since you’ve likely fiddled around with the settings in an effort to fix the problem, re-run the Gateway Setup Assistant to reset any settings back to their original values. You will need the following information handy from your network administrator:
- External IP address
- External DNS server IP address (Google’s can be used and is easy to remember, 8.8.8.8)
- External gateway IP (typically xxx.yyy.zzz.1)
Ensure that you choose the correct interfaces to be external and internal. When in doubt, go to System Preferences → Network, unplug the external cable, and note which interface goes down.
Note: In the setup wizard interfaces may be named slightly differently. Instead of being called “Interface 1,” the wizard will display
en0. The same applies to “Interface 2,” which is displayed asen1.
Use the following settings:
- WAN Interface - The ethernet interface identified above that faces the outside world
- LAN Interfaces - Choose one or more interfaces that clients will be plugged into.
- VPN Settings - Enabled VPN if desired
Confirm that the settings the wizard produced are correct for your setup and click Continue. At this point your clients should not be able to access the Internet. We need to make some manual changes.
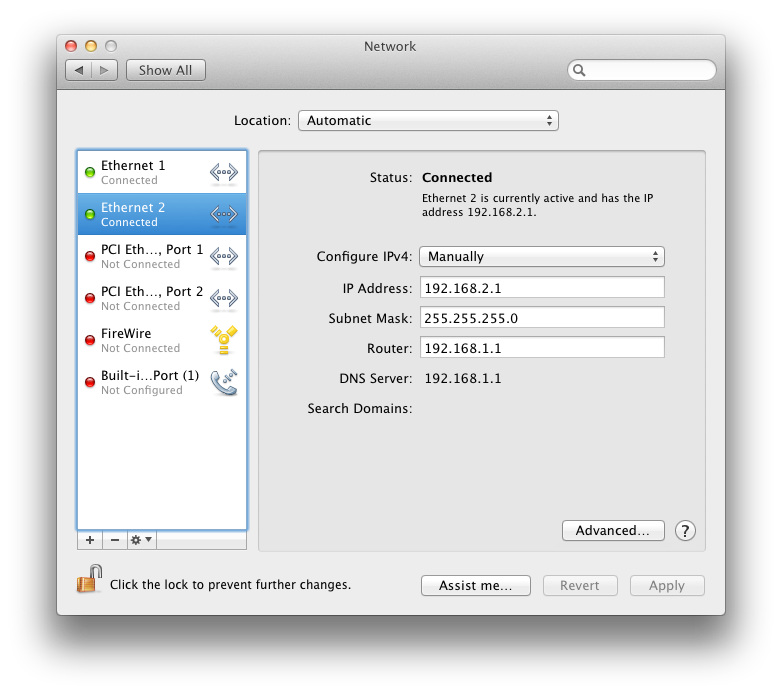
System Preferences → Network
WAN Interface
These settings will largely depend on your network setup. You will want to configure IPv4 manually, and specify the correct outgoing settings. Take note of the outgoing DNS server here, you will need it later.
LAN Interface
The IP address assigned to the internal interface by the wizard is incorrect and must be changed. It will have assigned it the IP of 192.168.1.1, it must be changed to 192.168.2.1. The subnet mask, router, and DNS server should be fine. You can leave the search domain blank.
Server Admin
DHCP
Since we’ve changed the IP of the server, the subnets must also be modified. In Server Admin choose the DHCP tab and click Subnets in the toolbar. Remove all subnets created by the wizard. Create a new subnet with the following settings:
-
General
- Subnet Name: 192.168.2
- Starting IP Address: 192.168.2.2 (Can increase the last octal, but not decrease it.)
- Ending IP Address: 192.168.2.254 (Can decrease the last octal, but not increase it. It must be greater than the starting IP’s last octal.)
- Subnet Mask: 255.255.255.0
- Network Interface: en1 (In my case, as stated above the network interface will have a different name here than what shows in System Preferences.)
- Router: 192.168.2.1
- Lease Time: 1 hour (You can change this if desired.)
-
DNS
- DNS Servers: Your external DNS server (Again you can use Google’s if desired.)
- Search Domain: Can be left blank.
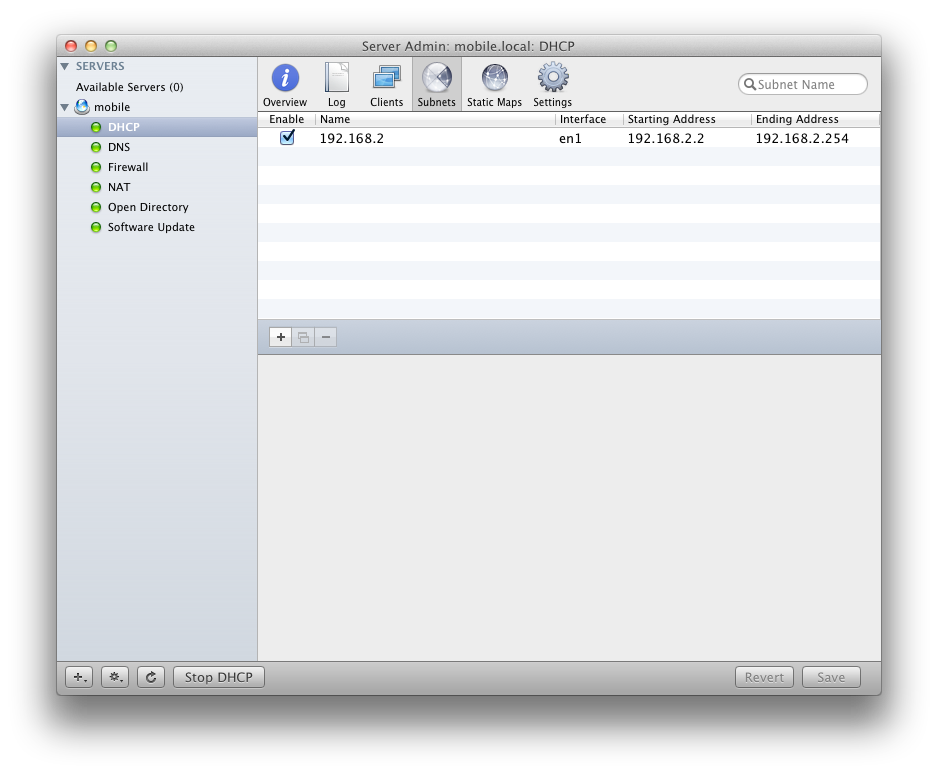
Be sure to check the Enable checkbox beside your newly created subnet. Save these settings and restart DHCP. Your clients will need to obtain new DHCP information.
To verify that your DHCP server is working correctly, disable and then enable an interface on one of the client machines. If it obtains an IP address in the form 192.168.2.xxx then you have correctly configured DHCP.
DNS
By comparison, DNS is simple to configure. Select the DNS tab on the right, click the Settings toolbar item that appears, and add a Forwarder IP Address. This should be the same as the external DNS server specified in the DHCP setup above. This server is used to answer queries not cached on the OS X Server machine.
Save this setting, DNS should not need to restart.
Open up a terminal on a client machine and type in the following command:
$ host google.comIf you receive a response in the following form, then you have correctly configured DNS:
$ host google.com
google.com has address www.xxx.yyy.zzz
google.com mail is handled by vv www.xxx.yyy.zzz
If not, verify that you have added a Forwarder IP Address correctly and try restarting the DNS service.
NAT
The NAT service is the only one correctly configured by the setup wizard. To verify, click the NAT tab on the left, then open the Settings toolbar. Verify that the IP Forwarding and Network Address Translation (NAT) option is selected, that the External network interface is correctly selected, and check Enable NAT Port Mapping Protocol.

If you make a change, save your settings and restart the NAT service.
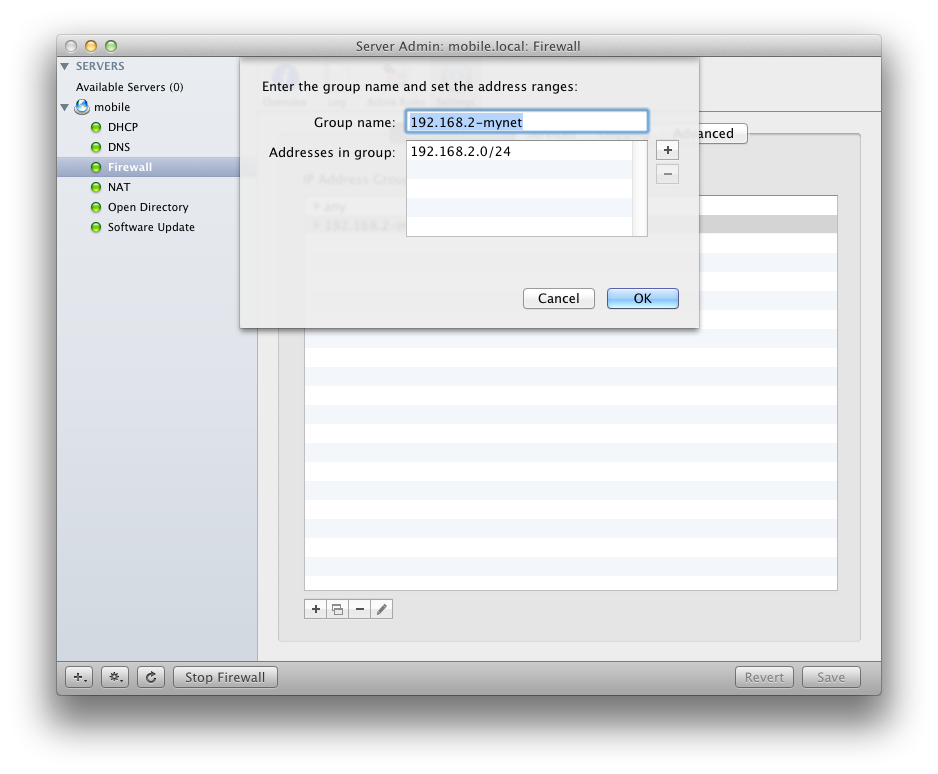
Firewall
This is by far the trickiest service to configure. Select the Firewall tab, then the Settings toolbar icon.
Address Groups
Remove all address groups created by the wizard. This should include any named in the form 192.168.xxx-net.
Add a new IP address group, naming it 192.168.2-net, or similar. If you used the same subnet as I did above (255.255.255.0), then change the Addresses in group to be 192.168.2.0/24.
Services
Be sure to select your newly created service in Editing services for. For testing purposes, select the Allow all traffic radio button and save changes. If you have performed all of the steps correctly, your clients should now be able to ping external servers and access the web.
A better firewall configuration is out of the scope of this document.
Troubleshooting
- By far the biggest problem I had was getting the firewall rules all correct. If you suddenly lose the ability to ping external servers, access the web, etc. and you were adjusting firewall rules, chances are you made a mistake.
- I’ve also found that OS X Server’s services sometimes break and need to be restarted. Typically restarting DNS or NAT fixes any issues. You can double-check which service is the issue by attepting to run the
hostcommand from above again. If it returns a result, NAT is broken. If it does not, DNS is broken. Repeat this until everything works.